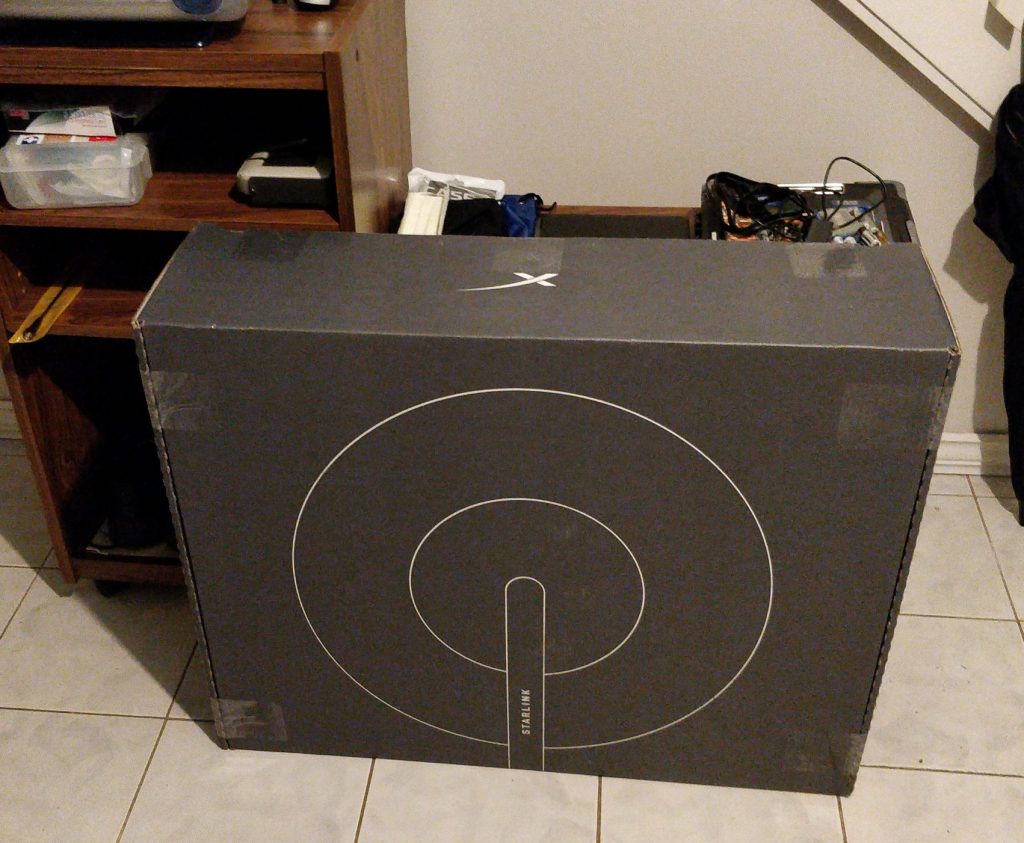
It was a weekday afternoon when my roommate messaged me “you have just received a large box.” I could barely contain my excitement as I meandered through the rest of my workday, because I knew what that large box contained! After many long months of waiting my Starlink starter pack was here!
For those of you who have been living under a rock for the past few years, Starlink is Elon Musk’s pet project to launch a satellite-based Internet service by leveraging a constellation of thousands of Low Earth Orbit (LEO) satellites. The service promises to deliver multi-megabit speeds to the entire globe with latency comparable to that of other wireless services. As I explained in a previous article, LEO satellites don’t hold a fixed position above the earth, instead orbiting the Earth at about 25,000 km/h. Because these satellites are constantly whizzing around above our heads they are only visible in the sky for a few minutes at a time which means dozens of them are needed to provide 100% coverage to the globe, otherwise you would need to wait until one comes into view, and quickly send a message before it vanishes over the horizon.
Traditionally, LEO satellites have been used to provide phone and limited data service to devices like satellite phones and the Iridium GO!, however, in 2015 Elon Musk blew convention away when he announced plans to deliver high-speed, multi-megabit, low-latency Internet connectivity using the technology. At the time, Musk’s plan was scoffed at by many in the industry as being too ambitious but over the next several years it became quickly apparent that the service worked as advertised and Starlink began signing up customers in select countries around the world.
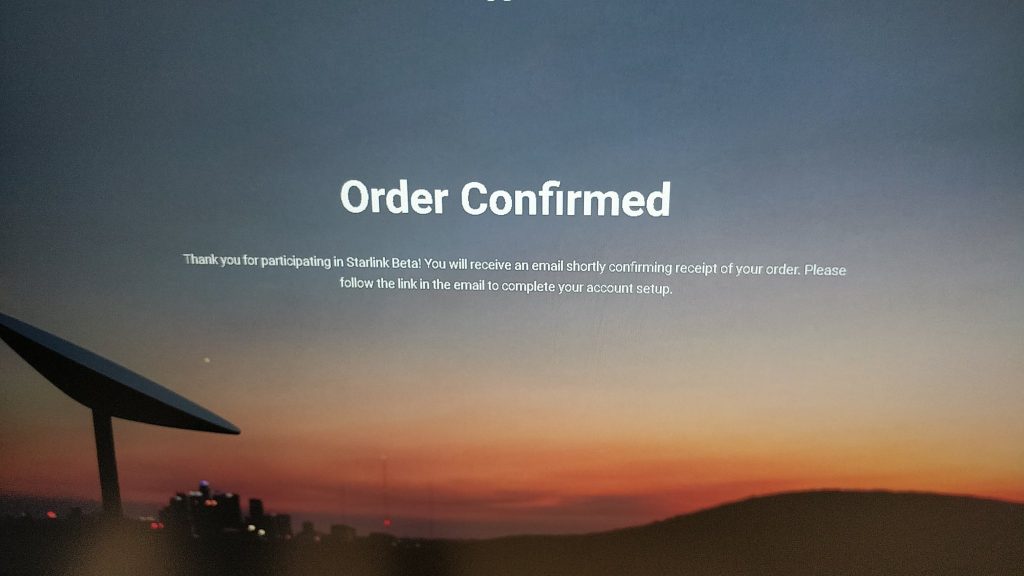
Needless to say, excitement around Starlink has been growing since the technology promises to be a complete game changer for connectivity to rural and undeserved communities. As beta reports of the service working well began to surface online, requests to join the program grew, and by the time Starlink announced an open beta in January of 2021 there was already a substantial wait-list! By the end of January, 2021 I put myself on the list and my journey into the world of Starlink began. By February 10th I would receive a notification that my account had been selected to participate in the beta and was asked to pay a $100 deposit, after which began the long wait for the availability of hardware.
Like with many Elon Musk projects, the delivery timeline of Starlink hardware was a moving target, so I wasn’t at all surprised to not hear anything for several months. Que my excitement though, when in September I got an email notification saying my order was ready and it was time to pay for the rest of the equipment!
Starlink hardware is not cheap. The ground-station equipment ran me about $650 CAD, however, this was brand new technology and I was well aware of the fact that early adopters always pay a higher price for hardware as companies attempt to recoup R&D costs. After paying for the order I got to wait a little bit longer as the gear was prepped for shipment and then sent out via courier. By the middle of October the hardware had finally arrived and I was eager to set it up!
Initial Setup
A Starlink ground station consists of a dish, power injector and a NAT router. The dish is around 2′ in diameter and is an entirely self-contained terminal. It has a built-in motor to automatically position itself for the best signal and only exposes a CAT5 connector to the end user. This is actually something of an unfortunate design decision, since I was hoping I would be able to eventually use the system in a travel capacity (the service is currently Geofenced to around 15km of your service address but promises to be worldwide by the time the beta is over). My original hope was that the dish itself would be more of a ‘dumb’ antenna and I could pick up another one on eBay and simply move the router between my ‘travel’ dish and my ‘house’ dish, but since the smarts are all inside the dish itself I’ll need to bring the entire dish travelling which means a trip up to the roof to retrieve it. The brings me to another point of consternation – the 100′ length of CAT5 cable is permanently attached to the dish, so if I want to move the dish I’ll need to un cable-manage a hundred feet of CAT5 which will take literally hours. There have also been several reports on Reddit of people having their cords damaged and then needing to replace the entire dish. In my humble opinion this is a HUGE oversight that should be addressed in newer hardware revisions, and I’m seriously considering connectorizing the CAT5 cable by re-terminating it close to the dish and adding an outdoor inline coupler to connect the two ends.
Initial setup of the service is pretty easy, the dish and router comes pre-programmed to your Starlink account so it should work ‘out of the box’ with minimal setup. The included POE injector can power both the dish and and NAT router so you only need to use a single outlet. The dish itself seems to use about 100W of power to run. After plugging in both the dish and the router, the dish went through some kind of initial setup process, moving back and forth presumably looking for a signal. After a few minutes the router began broadcasting an SSID.
Initial setup is entirely via the Starlink Android or iOS app, and while I would have preferred to have the option of a more traditional setup experience via a WebUI I have to admit the process was pretty seamless.
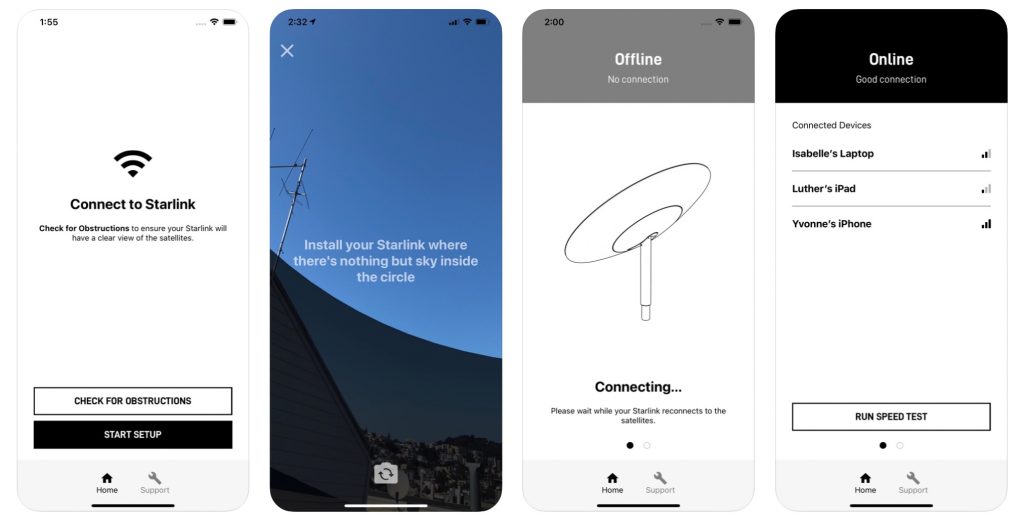
First, you need to connect your phone to the SSID being broadcast by the NAT router. Once connected you can launch the Starlink app and it will find the router and dish. The App walks you through an initial setup of the WiFi SSID, including securing it with a password and then gives you the option to complete setup. The App does have a helpful button to ‘check for obstructions’ where you can point your phone’s camera at the sky and visually see where the satellites will appear so you can quickly validate if something will be blocking the signal.
Once started, the setup process took around 20 minutes, during which I saw the dish move a couple of times. There was no progress bar or real feedback during the initial setup and after a few minutes I began to wonder if anything was actually happening, nevertheless about 20 minutes later the green ONLINE icon appeared in the app and I was actually online!
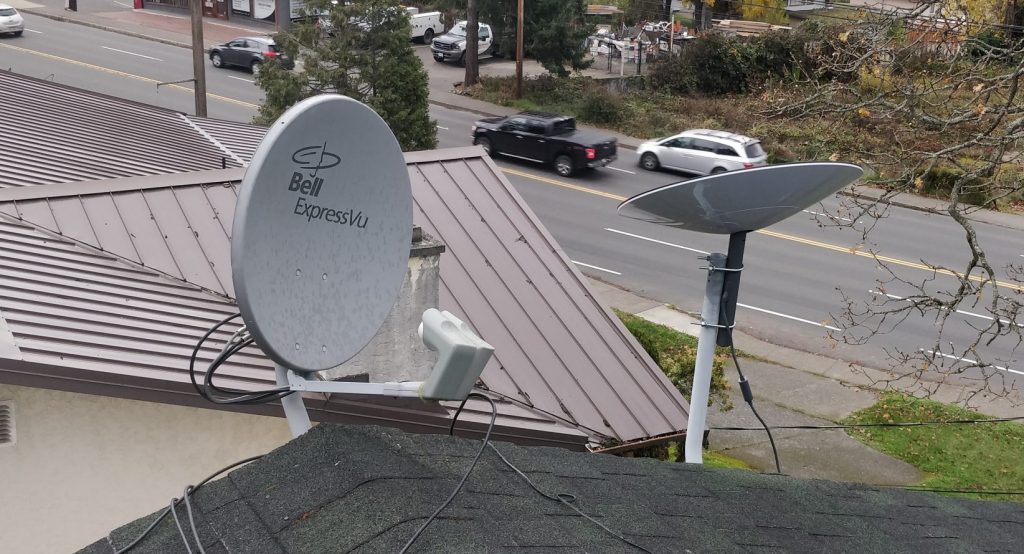
My initial tests of Starlink were on the ground, however, I quickly discovered that the service needs to have a completely unobstructed view of the sky for maximum reliability. Some pesky tree branches were enough to interrupt service for minutes at a time so I resigned myself to moving the dish up to the roof where it could have a complete view of the sky. This lead me to the discovery of a new problem – the Starlink kit doesn’t include any kind of pole mount! While the kit comes with a fantastic stand which is great for portable operation, there’s no way to permanently attach it to a pole or wall. A trip to Home Depot and a few U-Bolts later and I managed to attach the dish to an old satellite mount, but the lack of any kind of mounting solution is another major oversight.
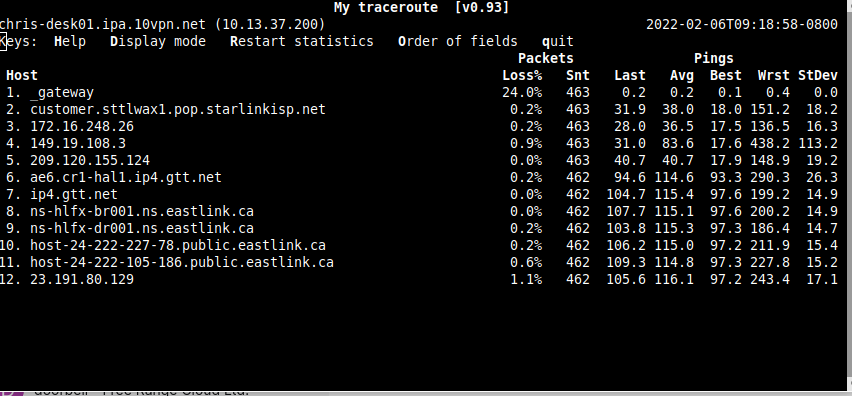
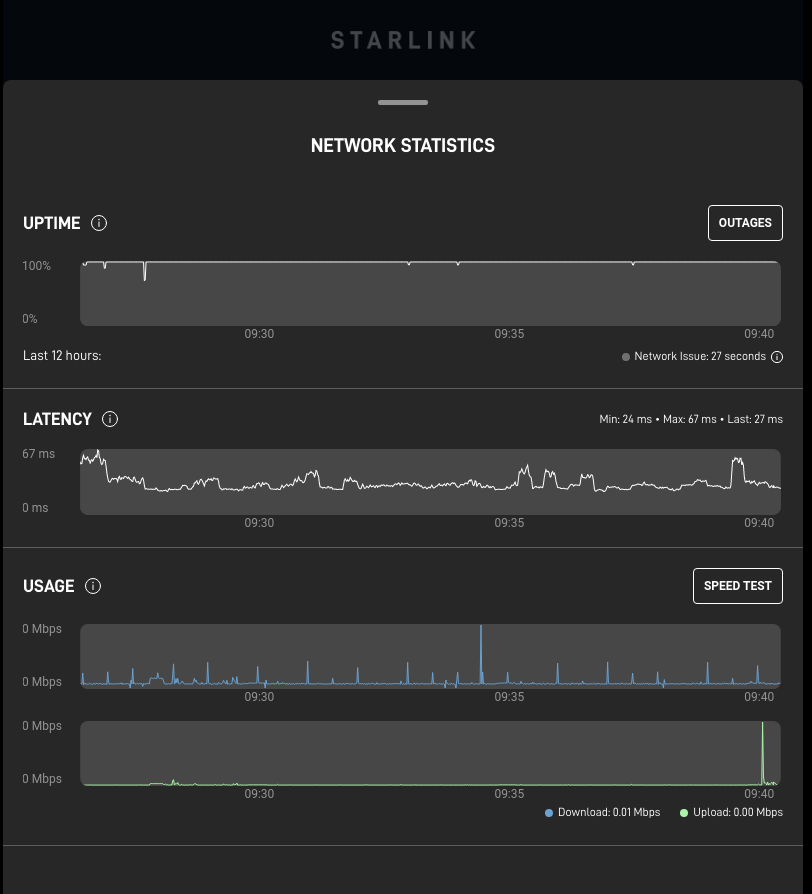
Once on the roof, the system performed much better. While I was initially noticing connection dropouts for a minute or two every hour, after moving it to the roof I have rarely noticed any dropouts. Performance-wise the system works quite well. Speed tests consistently give between 100 and 150mbps down and between 10 and 15 mbps up, this rivals the cable Internet connection that I have at home. The real standout here is the latency. Traditional satellite Internet services are well known for delivering decent speeds, but have TERRIBLE latency, with a first hop round trip time being anywhere from 600 to 1000ms. This has traditionally made things like VoIP calls and video conferencing impossible over satellite Internet connections. On the other hand, Starlink Internet with it’s much closer LEO satellites has a first hop latency of 30-40ms, comparable to a well-used LTE connection!
For me, Starlink traffic is down-linked in Seattle where it is routed out to the general Internet. This is a sensible routing path since my service address is around 100km from Seattle, but I’m unsure what the latency would be like if I was further away from the groundstation (I’m assuming there are multiple downlinks). Once Starlink is allowed to be used mobile I can start conducting some more testing!
Integrating it into my Network
The bundled Starlink router is notable for it’s complete lack of wired networking, something that just wasn’t going to work with my custom network setup. I quickly discovered that after the initial setup, the included router can be discarded and it was possible to plug the output of the POE injector directly into my existing router and pull and an IP address directly via DHCP! When connected to my router I was also assigned an IPv6 address, something that the included router didn’t do.
When I initially setup Starlink I was handed a private IP in the 100.64.0.0/10 space, which was not unexpected. This private address was being translated to a public IP at Starlink’s edge routers. This type of setup is referred to as Carrier Grade NAT, and essentially allows an ISP to conserve valuable IPv4 space by putting a large number of customers behind a single public-facing IPv4 address. The setup works for 90% of subscribers since the vast majority of Internet users connect outbound to a service and don’t use peer-to-peer connections.
The above being said, while my initial IP was a NAT address, more recently, I have observed my router being handed an address in the 98.97.152.0/21 range which is a publicly routable IP range. Additional testing has also indicated that inbound connectivity to my assigned IP also works, which means my Starlink connection is no longer behind a firewall or NAT device and is simply routed directly to the Internet like any standard cable or GPON service. I’ve done a bit of research and have not been able to find any official announcement or comment about the fact that public IPs are now being handed out. Maybe I’m part of some weird test program or maybe it’s a complete accident, but whatever the reason, I’m pretty happy with the public address!
In addition to providing Internet connectivity, the Starlink dish makes it possible to gather some pretty interesting stats. The controller runs a webserver on the hardcoded IP of 192.168.100.1, so if you configure your router to have a secondary IP in that range you should be able to connect to it. Recently (within the last month or so) the IP has been redirecting to dishy.starlink.com, which is a DNS record that starlink started publishing recently:
; <<>> DiG 9.16.1-Ubuntu <<>> dishy.starlink.com
;; global options: +cmd
;; Got answer:
;; ->>HEADER<<- opcode: QUERY, status: NOERROR, id: 48799
;; flags: qr rd ra; QUERY: 1, ANSWER: 1, AUTHORITY: 0, ADDITIONAL: 1

;; OPT PSEUDOSECTION:
; EDNS: version: 0, flags:; udp: 65494
;; QUESTION SECTION:
;dishy.starlink.com.		IN	A

;; ANSWER SECTION:
dishy.starlink.com.	383	IN	A	192.168.100.1

;; Query time: 12 msec
;; SERVER: 127.0.0.53#53(127.0.0.53)
;; WHEN: Sun Feb 06 09:43:41 PST 2022
;; MSG SIZE  rcvd: 63
Reliability
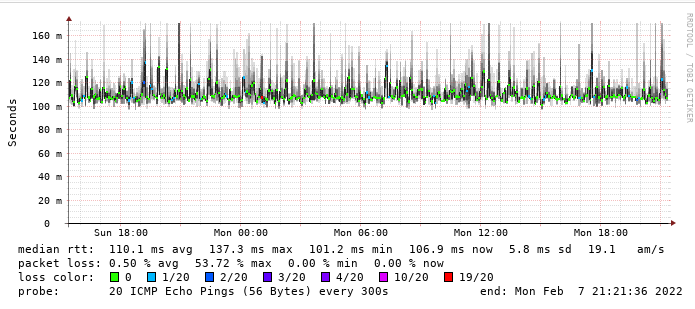
I’ve begun graphing the performance of the Starlink connection out of an academic curiosity as to how it performs over a longer period of time, and it is reasonably reliable. Packet loss does occur, sometimes as high as 20% but for the most part the connection works well enough to use as a normal Internet line. I have observed three occasions where the dish would seemingly stop responding completely, necessitating a forced reboot (unplug/re-plug in), but I’m hoping that was due to botched firmware updates or similar and won’t be an ongoing occurrence. It’s been a few weeks since the last outage and fingers crossed that trend continues.
Closing Thoughts
Overall, I have been extremely impressed with Starlink, particularly when I consider it’s a brand new technology that is still very much in a beta testing phase. While it’s not in a state where I would use it for my primary Internet connection (at least when I have other options), as a backup line or as a line I can use while traveling it is perfect. I can also see how this would be a game changer for rural users where wireline service isn’t available. While the hardware is a bit expensive at around $650 CAD, and the monthly service price isn’t cheap at $144 after taxes, both are reasonable, particularly when compared to the outrageous prices for high bandwidth LTE service.
At the end of the day, it is a service I would recommend, just don’t expect miracles (yet).