In my years of working in IT and technology I’ve never heard of anyone who considered dealing with FAXes “fun.” Most of the time my fellow sysadmins react to FAX tickets with either terror because they’re too young to have experienced the technology, or with absolute disgust as they remember the old-days of troubleshooting with buttsets, tone generators and termination blocks.
Nevertheless, one day when digging through a box of old electronics I found a USB FAX modem, and decided to see if I could resurrect this old technology get it working in a modern environment.
So what is a FAX
Before embarking on this journey into FAXes let’s first define what a FAX is and how it works. Short for facsimile, FAXes were the fist commercially widespread method of transmitting images and text electronically.
From an implementation perspective, a device (FAX machine) is connected to the standard telephone network the same as any traditional phone would be connected. When a user wishes to send a FAX, they would insert one or more pages into the machine, and dial the destination phone number. The FAX machine would dial the number (in the same way that a person would dial a telephone number) and the phone network would route the call. At the other end, the phone line would ring (just as it would for an incoming voice call) and the recipient FAX machine would pick up call. At this point, the call has been completed in the same was as a standard voice call would be.
The two fax machines then exchange a series of high-pitched tones with each other, to validate that they are indeed both FAX machines and to negotiate parameters such as bitrate and compression settings. Once both machines have agreed upon the parameters, the sending machine encodes the pages and transmits them as tones over the open phone line. Once the transmission is complete, the recipient and source FAX machines exchange another series of tones to validate that the message was received successfully and then the call is terminated. The entire process takes place over an analog phone connection, and by listening to the call it is actually possible to hear the different stages of transmission. Very cool!
FAX in a modern VoIP environment
While FAXes were originally developed in an analog era where businesses would often have one or more dedicated telephone lines, since the mid 2010’s VoIP or voice-over-Internet has become the de-facto standard for making and receiving telephone calls. While adapters exist for connecting old-school analog phones to a VoIP system (referred to as ATAs or Analog-Telephone-Adapters), it is somewhat more complicated to send FAXes in a VoIP environment.
So, why is it not possible to send a FAX directly from a VoIP ATA? Well, it boils down to the fact that most VoIP systems heavily leverage compression of voice data. Such audio compression relies on the fact that human speech takes up a very small portion of the audio spectrum (typically between 50 and 1000Hz). This means that traditional VoIP codecs can exclude large chunks of the audio spectrum (typically frequencies above 3KHz) to save an incredible amount of network bandwidth. The result is nearly imperceptible to humans, but for FAX machines which use a much wider range of audio frequencies, the compression algorithms makes successful transmission nearly impossible.
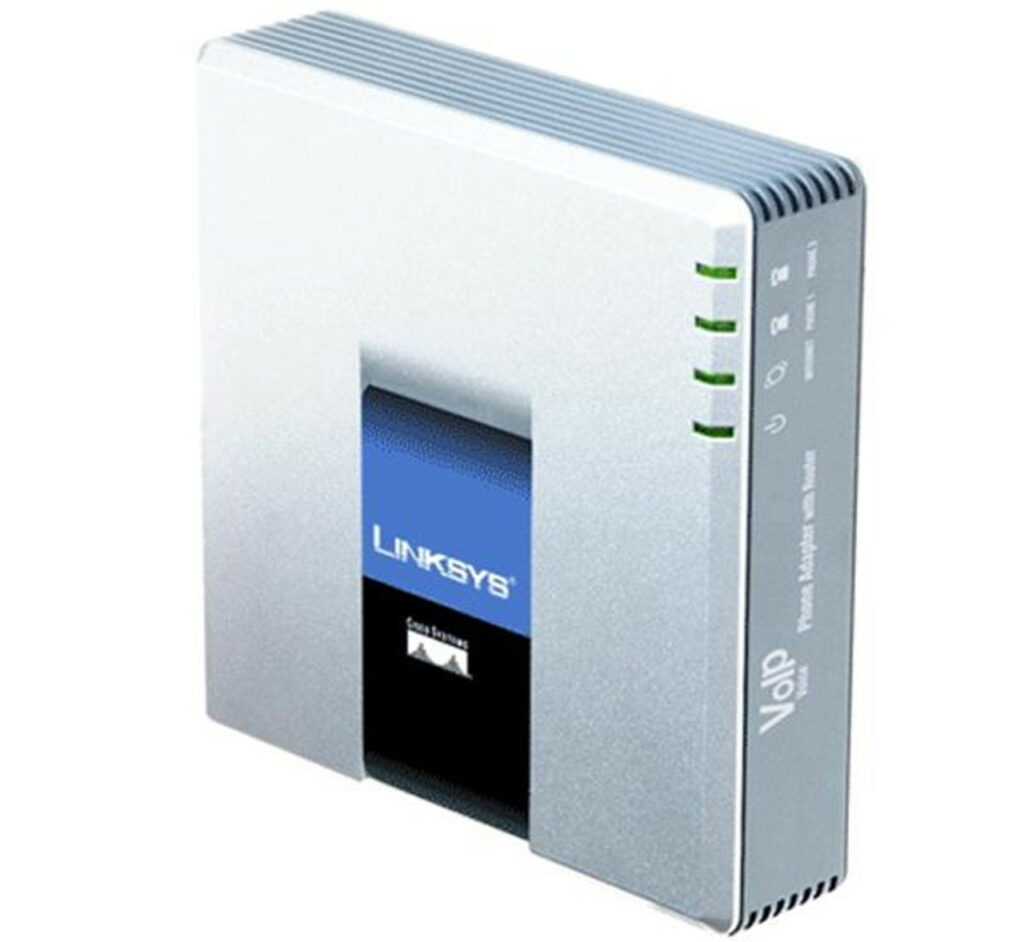
So, how do we solve this? Well in 1998 the T.38 protocol (referred to more commonly as Fax-over-IP or FoIP) was introduced. T.38 works by talking to a FAX machine using standard analog audio, but then converting the audio into a format more friendly for transmission over IP networks. You can almost think of a T.38 modem as a buffer which spoofs the FAX machine at the other end of the connection. Unfortunately, for a T.38 session to work, each leg of the connection needs to support the protocol; so you need a T.38 ATA, a T.38 VoIP provider, and if you use an intermediate PBX, it also needs to support T.38. For the purposes of this blog, I’ll be using a Linksys SPA2102 ATA, a PBX based on Asterisk and a SIP trunk from the provider Telnyx to talk to the outside world.
Some notes about the SPA2102
Before I get into the implementation details, I wanted to leave a couple of notes about working with the Linksys SPA2102 ATA. As noted above, in order to achieve reliable transmission of FAXes over an IP-based network, we need an ATA which supports the T.38 protocol. Unfortunately, such ATA’s are less common then their voice-only counterparts and I found myself in a bit of a rabbithole while trying to identify a suitable candidate. I eventually settled on the Linksys SPA2102, which is an older device (released around 2012) but struck the right balance between compatibility, price and availablity.
Now, I was used to configuring ATAs by plugging them into a LAN, identifying it’s IP address and then browsing to a web configuration page. However, upon plugging in the SPA2102, I found that I was unable to access any kind of configuration page, even though the device was reachable on my network. After some research, I discovered that the SPA2102 ships in a default state with the web-configuration disabled, leaving limited options for configuring SIP accounts on the device.
Fortunately, it IS possible to enable a web-configuration page, you just need to know what to do. Start off by connecting an analog phone to one of the two phone ports on the device. Any phone will do, but it needs to be an old-school analog one. Once you have the phone connected, pick up the receiver and dial ‘****’ (you don’t need a dial tone). The ATA should pick up the call and answer with “Linksys Configuration Menu.” Now dial 7932# and you should prompted to press ‘1’ to confirm. Press 1# and the ATA should read out a success message. If you want to determine the current IP address of the device, you can enter 110# and the software should read out the current IP.
In the event you need to factory reset the ATA, you should dial 73738# from the main configuration menu, press 1# when prompted for confirmation, and press 1 a second time to reset the device. The ATA will reboot and you should be able to follow the above steps to enable the WebUI.
Putting it all together
So, we now have all of our pieces, it’s now time to start putting it all together. I’m going to start simple, by sending a FAX from my USB modem directly into my Asterisk PBX server. This ensures I can control both sides of the connection for troubleshooting purposes.
Start by creating an extension for your FAX ATA in Asterisk, and ensuring that T.38 support is enabled in Asterisk itself. Since version 1.6 Asterisk has excellent support for T.38, so you want to ensure you are running, at a minimum, version 1.6 of the software. You’ll then want to add t38pt_udptl=yes as well as faxdetect=yes into your sip.conf configuration file.
I also added a virtual extension to Asterisk in order to receive FAXes directly to the filesystem on my phone server. To do this, I added the following to my extensions.conf file:
  exten => 9999,1,Verbose(3,Incoming fax)
    same => n,Set(FAXDEST=/tmp)
    same => n,Set(tempfax=${STRFTIME(,,%C%y%m%d%H%M)})
    same => n,ReceiveFax(${FAXDEST}/${tempfax}.tif)
    same => n,Verbose(3,- Fax receipt completed with status: ${FAXSTATUS})
You’ll then need to configure your ATA to talk to your Asterisk server, using the dedicated FAX extension you created. You can use the WebUI on the ATA to validate that it has indeed registered to the SIP server.
Finally, we need to connect our FAX machine to the analog phone port on the ATA. If you’re using a dedicated FAX machine, you can simply plug the phone line port into the corresponding line port on the ATA, however, in my situation because I’m using a USB modem, I needed to do some additional setup.
Setting up Hylafax
For the purposes of this blog post, I’ll be using Hylafax which is an open source Linux-based FAX server that integrates with a hardware modem. If you’re running on Windows, you can use the built-in “Windows Fax and Scan” application to do the same thing.
To install Hylafax on a Debian-based Linux system you simply need to run:
sudo apt install hylafax-server hylafax-clientOnce the packages are installed, you then need to run the faxsetup program which you will use to configure the modem. The program is interactive, and will prompt you for each of the configuration options. For the most part, I used the default options:
# faxsetup
Setup program for HylaFAX (tm) 6.0.6.

Created for x86_64-pc-linux-gnu on Thu, 05 Sep 2019 10:54:00 +0000.

Reading cached parameters from /var/spool/hylafax/etc/setup.cache.

...

	HylaFAX configuration parameters are:

	[1] Init script starts faxq:		yes
	[2] Init script starts hfaxd		yes
	[3] Start paging protocol:		no
Are these ok [yes]?

Modem support functions written to /var/spool/hylafax/etc/setup.modem.
Configuration parameters written to /var/spool/hylafax/etc/setup.cache.

Restarting HylaFAX server processes.

You have a HylaFAX scheduler process running.  faxq will be
restarted shortly, as soon as some other work has been completed.
Can I terminate this faxq process (7529) [yes]?
Should I restart the HylaFAX server processes [yes]?

/etc/init.d/hylafax start
Starting hylafax (via systemctl): hylafax.service.

You do not appear to have any modems configured for use.  Modems are
configured for use with HylaFAX with the faxaddmodem(8) command.
Do you want to run faxaddmodem to configure a modem [yes]?
Serial port that modem is connected to [ttyS0]? ttyACM0

Ok, time to setup a configuration file for the modem.  The manual
page config(5) may be useful during this process.  Also be aware
that at any time you can safely interrupt this procedure.

Reading scheduler config file /var/spool/hylafax/etc/config.

No existing configuration, let's do this from scratch.

Country code [1]?
Area code [415]? 778
Phone number of fax modem [+1.999.555.1212]? <your fax number>
Local identification string (for TSI/CIG) ["NothingSetup"]? TEST
Long distance dialing prefix [1]?
International dialing prefix [011]?
Dial string rules file (relative to /var/spool/hylafax) [etc/dialrules]?
Tracing during normal server operation [1]?
Tracing during send and receive sessions [11]?
Protection mode for received facsimile [0600]?
Protection mode for session logs [0600]?
Protection mode for ttyACM0 [0600]?
Rings to wait before answering [1]?
Modem speaker volume [off]?
Command line arguments to getty program ["-h %l dx_%s"]?
Pathname of TSI access control list file (relative to /var/spool/hylafax) [""]?
Pathname of Caller-ID access control list file (relative to /var/spool/hylafax) [""]?
Tag line font file (relative to /var/spool/hylafax) [etc/lutRS18.pcf]?
Tag line format string ["From %%l|%c|Page %%P of %%T"]?
Time before purging a stale UUCP lock file (secs) [30]?
Hold UUCP lockfile during inbound data calls [Yes]?
Hold UUCP lockfile during inbound voice calls [Yes]?
Percent good lines to accept during copy quality checking [95]?
Max consecutive bad lines to accept during copy quality checking [5]?
Max number of pages to accept in a received facsimile [25]?
Syslog facility name for ServerTracing messages [daemon]?
Set UID to 0 to manipulate CLOCAL [""]?
Use available priority job scheduling mechanism [""]?

...

CountryCode:		1
AreaCode:		778
FAXNumber:		<fax number>
LongDistancePrefix:	1
InternationalPrefix:	011
DialStringRules:	etc/dialrules
SessionTracing:		11
RingsBeforeAnswer:	1
SpeakerVolume:		off
GettyArgs:		"-h %l dx_%s"
LocalIdentifier:	TEST
TagLineFont:		etc/lutRS18.pcf
TagLineFormat:		"From %%l|%c|Page %%P of %%T"
MaxRecvPages:		25

Are these ok [yes]?

...

Hmm, this looks like a Class 1 modem.
Product code (ATI0) is "56000".
Other information (ATI3) is "CX93001-EIS_V0.2002-V92".
DTE-DCE flow control scheme [default]?
Modem manufacturer is "Rockwell/Conexant".
Modem model is "AC/K56".

Using prototype configuration file rc288dpi-1...

The modem configuration parameters are:

ModemDialCmd:		ATDT%s
ModemFlowControl:	rtscts
ModemHardFlowCmd:	AT&K3
ModemMfrQueryCmd:	!Rockwell
ModemModelQueryCmd:	!RC288DPi
ModemNoFlowCmd:		AT&K0
ModemRate:		19200
ModemRevQueryCmd:	ATI3
ModemSetupDCDCmd:	AT&C1
ModemSetupDTRCmd:	AT&D2
ModemSoftFlowCmd:	AT&K4

Are these ok [yes]?

...
CountryCode:		1
AreaCode:		778
LongDistancePrefix:	1
InternationalPrefix:	011
DialStringRules:	etc/dialrules

Are these ok [yes]?

..
Should I run faxmodem for each configured modem [yes]?
/usr/sbin/faxmodem ttyACM0
At this point you can restart the Hylafax service (service hylafax restart) and check your /var/log/syslog to ensure it has started.
Sending your first FAX
Let’s start by sending our first FAX. In the Asterisk configuration above, I created a virtual extension (9999) for testing. By dialing this extension from a FAX machine (or from Hylafax) our Asterisk server should process the incoming message and save it to /tmp/ on the local machine. If you’re using a hardware FAX machine, you would simply dial the extension 9999 directly.
To send a fax via Hylafax:
$ echo "this is a test FAX" > ./fax
$ sendfax -n -D -d 9999 fax
If everything has gone well, you should see a TIF file appear in /tmp on your asterisk server containing our test FAX.
Troubleshooting
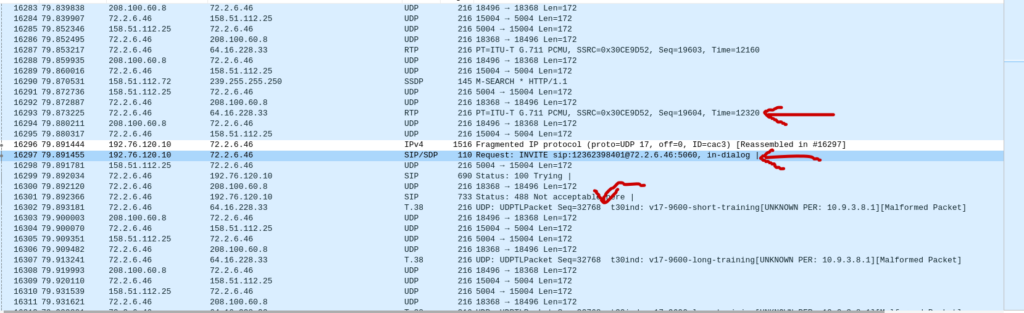
In the event that things don’t work, you need to do some troubleshooting. You can start by connecting a phone to your ATA using a RJ11 ‘Y-splitter’ and listening to the FAX call. You should hear tones from both your Asterisk server and the sending FAX machine.
You can also use TCPDump on the Asterisk server to monitor the connection. You should see the session initiate, and then upgrade to a T.38 session in the packet capture.
Finally, if you’re using Hylafax, keep an eye on /var/log/syslog while the FAX is sending, by default it it should tell you what went wrong.
Talking to the outside world
OK, by now you should be able to send FAXes to… yourself. Which is great, but the real fun comes when you can talk to other FAX machines out there in the world. To do this, we need to connect our Asterisk server to a SIP provider which supports the T.38 protocol. For the purposes of this guide, I will be using Telnyx, which has a good balance of price and affordability.
The instructions for each SIP provider will be different, but for the Telnyx integration, I needed to ensure by inbound phone number (DID) was FAX capable, and ensure that my SIP account had T.38 detection enabled (they do by default). Configuring a trunk in Asterisk is somewhat outside of the scope of this blog, but I’m assuming you already have a functional server if you’ve gotten this far.
Once you’ve configured your Asterisk server to talk to your SIP/FoIP provider, and validated your server is registered, you’re ready to send a FAX. Note that in order to receive inbound FAXes, you need to create a handler for inbound calls to your FAX number. In my case, I created a very simple mapping of my external phone number to my internal FAX extension:
[inboundT38Fax]
  exten => 1778<FAX number>,1,Dial(SIP/2002)
Now, to test it we need to call another FAX machine somewhere out in the world. Luckily, there are services which exist to test FAX machines. These services will receive your FAX and then send a reply back containing one or more pages. The three most reliable FAX test services I have found (as of February, 2023) are:
- Canon 1‐855‐392‐2666
- HP 1-888-473-2963
- Interpage (650) 530-9014
Inter-page is particularly useful since they will send you a reply containing your original message, plus a cover sheet. A great way to test multi-page FAXes.
Note that all of these services take a while to send you your reply, I found them to take an average of about 10 minutes before receiving a successful reply FAX in most cases.
The easiest way to monitor for Incoming FAXes is to connect an analog phone to the same ATA port using an RJ11 “Y-Splitter.” When a call is incoming, the analog phone will ring so you know someone is actually calling you. Just make sure you don’t pick it up since your FAX machine will need to terminate the call itself.
On Hylafax, you can monitor you syslog file to see the progress of an incoming FAX:
Feb 11 12:18:41 chris-desk01 FaxGetty[16351]: RECV FAX (000000013): from 5555556666, page 1 in 0:00:41, INF, 7.7 line/mm, 2-D MMR, 14400 bit/s
Feb 11 12:18:41 chris-desk01 FaxGetty[16351]: RECV FAX (000000013): recvq/fax000000005.tif from 5555556666, route to , 1 pages in 0:00:44
Feb 11 12:18:41 chris-desk01 FaxGetty[16351]: RECV FAX: bin/faxrcvd "recvq/fax000000005.tif" "ttyACM0" "000000013" ""
Feb 11 12:18:51 chris-desk01 FaxGetty[16351]: MODEM ROCKWELL RC288DPi/CX93001-EIS_V0.2002-V92
Hylafax will, by default, save received FAXes in /var/spool/hylafax/recvq
One final note on HylaFax – in it’s out of the box configuration it wants to send an email containing the received FAX. As I’m only using this for testing I didn’t want to receive emails (and I never configured an email server anyway, so it would just pollute my log with errors) so to disable such behavior you simply add
NOTIFY_FAXMASTER=neverInto the file /var/spool/hylafax/etc/FaxDispatch (create the file if it doesn’t exist)
And that’s it! By following this guide you should have the ability to send FAXes to both yourself and to the rest of the world. The setup should work with PC-based FAX modems as well as standalone FAX machines. How useful this new superpower is might be questionable, but there’s no doubt this is definitely some neat legacy technology to experiment with!
References
I did a lot of research while figuring out how to do this project. The following links were some of the more useful ones I found.